How to create your own VPN with Tailscale to get around stupid free WiFi network rules and protect your traffic

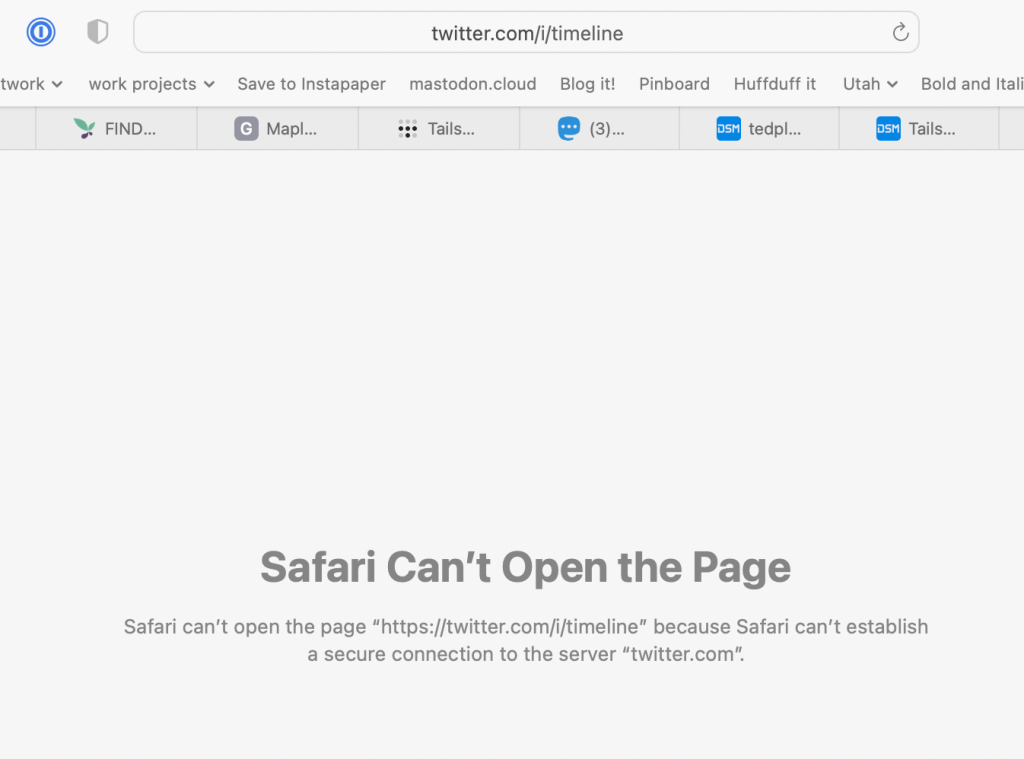
Today I pulled into a car dealership for some scheduled service, went to the waiting area, joined the free WiFi, then tried to pull up a YouTube video someone sent me. I got a DNS error. Then I tried to use my Twitter DMs to send a message to a friend I might see this week, but also got a DNS error. So I tried the good old tried-and-true North Star, Kottke.org and Kottke's site worked. Ok, that's weird.
Then I realized I was on free WiFi at the dealership and they'd probably flicked a switch in an admin screen to auto-block social network sites to keep their network traffic down.
Luckily, I remembered I put Tailscale on all my personal computers plus the Synology servers I have for managing files and movies and things.
A quick bit about Tailscale
I'm not an active developer these days but I've heard rumblings about how cool Tailscale is for the past couple years. Tailscale is a bit of networking magic that creates a small virtual private subnet between all your devices you've installed it on. No matter where your computers are, they can all talk to each other as if they were physically next to each other. I have it installed on my own home Synology server as well as a Synology server at a friend's house on a very fast gigabit fiber connection.
In the old days, whenever I needed to administer the Synology at a friend's house, I used to stop by his house every few months, jump on his local WiFi network with my laptop, login to the Synology then change admin settings or install apps that required I be on the local network.
A friend told me to try Tailscale instead. After about ten minutes of installing things on the remote computer (in person) and then my own desktop when I got back home, I could connect to my remote Synology as if I was sitting on my friend's wifi inside his house, and I could change any admin settings I needed to. Pretty incredible stuff.
Why do you need a temporary VPN?
You've probably heard ads for VPN services on podcasts and YouTube videos, and they're a good idea in general. You connect your machine to a server in the cloud and then route all your traffic through it, which means local rules on the network you're using don't apply. Also, it can be safer on public open WiFi networks because all your traffic is encrypted to the cloud server you connect to before it goes out to the greater world.
The problem with VPNs is two-fold. One, they can be expensive, many services cost 10-20 bucks a month and for me personally, I need to use them only for a handful of hours once every few weeks when I might be in an airport or in a hotel or using a dealership's free WiFi. The second problem is it's hard to trust any VPN company or service you don't own. A VPN owner is privy to all traffic and requests from every single client, so maybe it's internet lore, but a lot of people think most popular VPN companies are fronts for intelligence agencies and law enforcement, looking for people using a VPN for nefarious reasons and trying to suss out which customers are criminals.
The good news is using Tailscale as your VPN is 1) free, and 2) owned by you, hence no added security risks to outsiders.
How to setup Tailscale on a Synology as your VPN

The first thing I did was look at all my machines in my Tailscale admin console, then selected the one I wanted to add as my Exit Node. I pasted the internal IP address into a browser and got this screen, then I clicked the button to Advertise it as an Exit Node.
The exit node won't start until you confirm you want to do this. I went back to my admin console, saw the little "Exit Node (i)" label on the Synology, so I clicked that server to get to its settings.
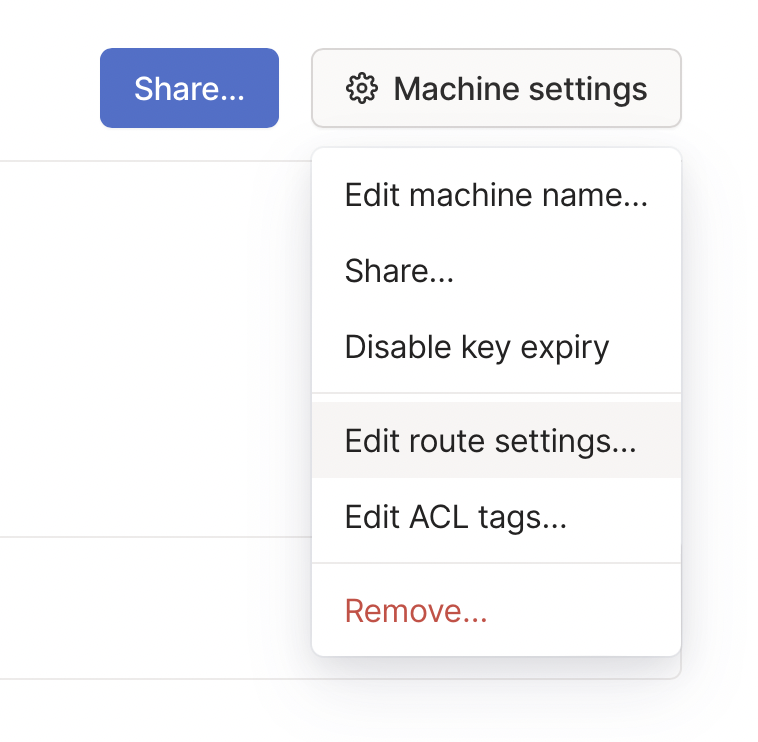
On the Machine settings menu, select Edit Route Settings to confirm you want to use it as an Exit Node for your network.
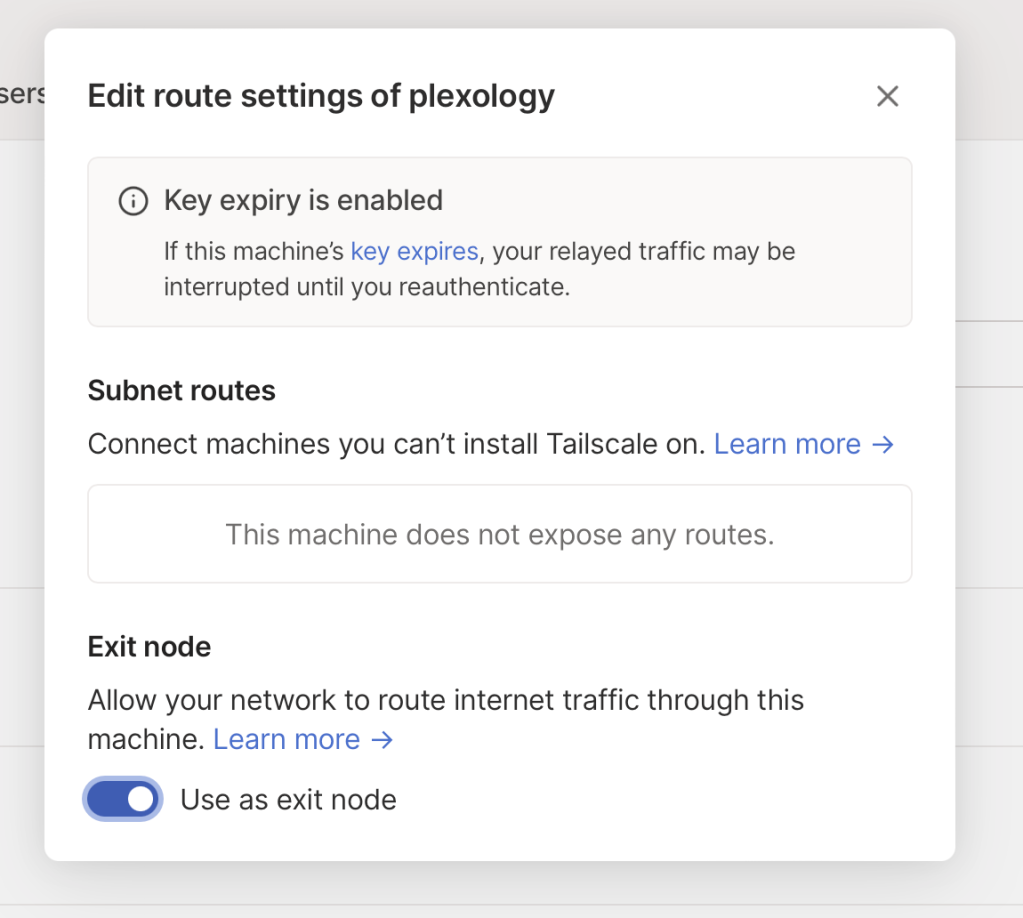
On this screen, you just need to click the little switch to Use as Exit Node to fully enable your VPN. You're done with all the setup!
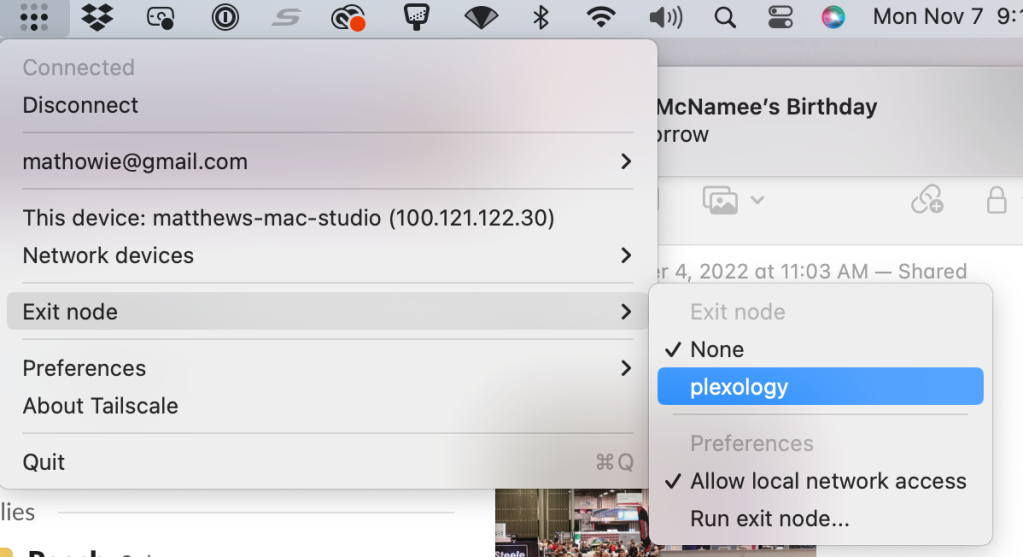
Next, connect to your exit node from your laptop on dodgy free WiFi, it's in your Tailscale menu up in the Mac OS menu bar app.
Last step: with your traffic all being routed to your remote Synology box, try loading a URL that previously didn't work. If it works, you're golden!
Enjoy your own private VPN
If you set everything up correctly, this means you now have access to your own private VPN any time you need, whenever you're on a dodgy network somewhere or need to get around local network blocks. It takes about five minutes if you've already set up Tailscale on your devices, and you can turn it on and off any time you like.
Pretty incredible stuff for software that costs nothing.
Note: these instructions are for a Macbook connecting to a Synology server, both with Tailscale running, but if you've got an always-on Mac desktop somewhere running Tailscale, you can use it as an exit node, but it's currently in beta and might not be as stable as the linux/Synology option
Subscribe to our newsletter.
Be the first to know - subscribe today